
Materials list · v1
3.0 m × 3.0 m Porcelain Paving Patio with Step to Lawn
Lay a 3.0 × 3.0 m outdoor porcelain paving patio on existing lawn next to house, with a single step down to the grass and edge restraint. Includes sub-base, bedding, edge restraints, jointing and sealant.
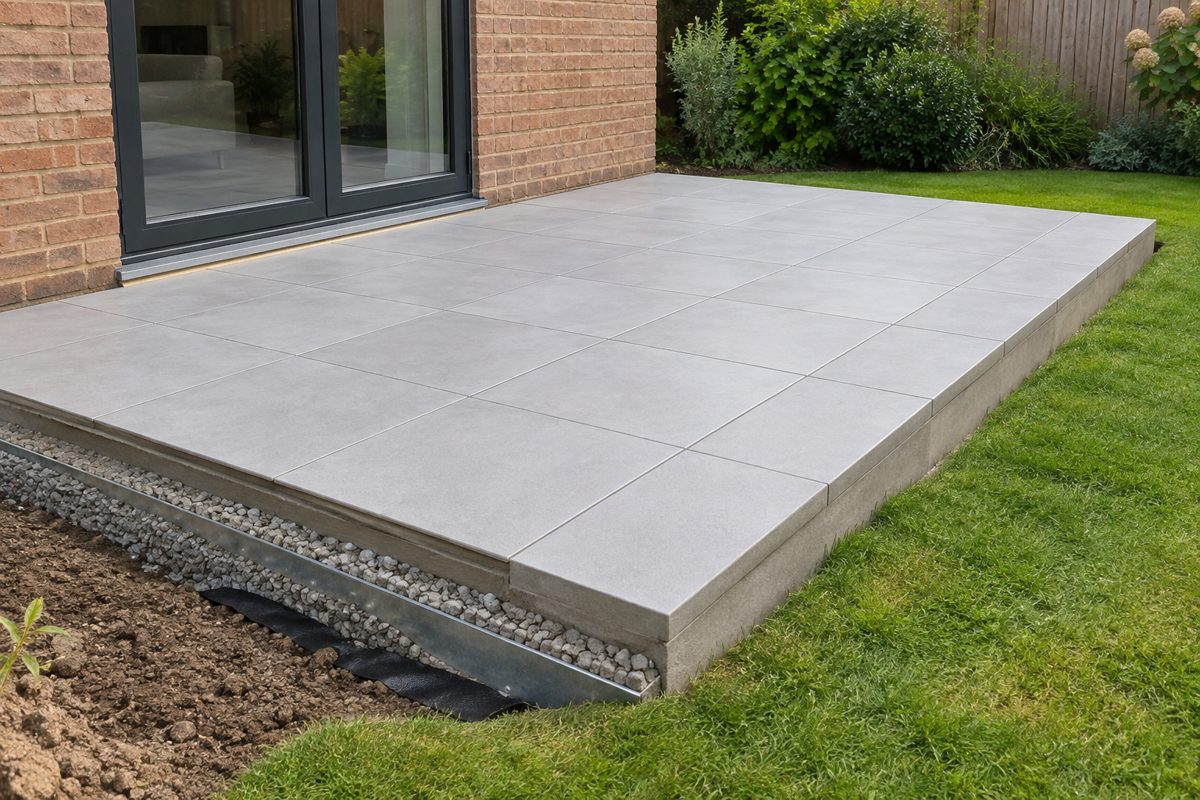
Checked against your spec — 6 checks passed on attempt 3.
What it was asked to show
- Rectangular patio, exactly 3.0 m wide (along the house) × 3.0 m deep (out from the house)
- Patio sits immediately next to the house wall on one long side; the other long side (opposite the house) has a continuous step down to lawn
- Single shallow step runs the full 3.0 m length of the outer edge; step rise approx. 100 mm and full length of patio
- Sub-base visible at the cutaway/edge: compacted MOT Type 1 approx. 100 mm deep under entire patio footprint
- Bedding mortar layer under tiles approx. 20–30 mm thick across the whole paved area
- Porcelain slabs laid in a 5 × 5 grid of 600 mm × 600 mm tiles (600 mm tiles produce five across the 3.0 m width); some tiles are cut at edges to finish the 3.0 m boundary
- Not: No railings, enclosures or raised planters around the patio — other sides are open except the house wall
- Not: No extra steps, ramps or multiple-step flights — only the single 100 mm step on the outer side
- Not: No furniture, people, tools, text, logos or signage in the scene
- Not: No drainage channels or visible drains at the junction with the house
- Not: No temporary coverings, tarps, or visible construction equipment (compactor, cutters, buckets)
An impression generated from your materials list, not a drawing to build from — proportions and details will differ from the real thing.
Materials
32 itemsClearing & Groundwork · 2
- 1Turf removed and disposed9 m²3.0 m x 3.0 mStrip existing turf and topsoil down to formation level, remove arisings from site
- 2Weed control membrane / geotextile14.0 m x 5.0 mSeparates sub-base from existing soil and suppresses weeds under paving
Sub-base & Bedding · 3
- 3MOT Type 1 sub-base aggregate1.05 m³Compacted sub-base (approx 100 mm compacted depth under 3x3 m patio)
- 4Sharp sand (for bedding mortar)12 x 25kg bagsSharp sand mixed with cement to form bedding mortar for porcelain laying (approx 20-30 mm bed)
- 5General purpose cement4 x 25kg bags25 kgMixed with sharp sand to form bedding mortar for paving and small concrete to bed edging
Edge Restraints & Step · 3
- 6Ready-mix postcrete (for setting edge)3 x 20kg bags20 kgQuick-set concrete for securing edge restraints / step blockings where required
- 7Galvanised steel edging (edge restraint)31 m lengths (3000 mm total)Edge restraint along patio perimeter to retain sub-base and create neat step down to lawn (3 m total length)
- 8Precast concrete step block (rear facing step to lawn)1100 mm rise x 3000 mm length (or equivalent single block trimmed to 3m)Form single shallow step down to grass along one side of the patio; trimmed/installed with postcrete
Porcelain Paving · 1
- 9Porcelain paving slabs (20 mm external grade)29600 mm x 600 mm x 20 mmExternal porcelain paving slabs to cover 9.0 m² with 15% wastage allowance; laid on mortar bed
Jointing & Sealants · 3
- 10Polymeric/paving jointing compound (flexible)2 x 5 kg tubs5 kg tubsJointing compound for 3-6 mm joints between porcelain slabs across 9 m²
- 11External grade silicone sealant (neutral cure) for perimeter2 x 300 ml cartridges300 mlSealant for movement joints and junction between patio and house where required
- 12Edge-capillary sealer / water repellent for porcelain (optional)1 x 1 L1 LOptional breathable water repellent to protect porcelain and reduce staining
Fixings & Small Sundries · 7
- 13Stainless steel screws / coach screws for fixing edging1 pack (100)5 x 60 mm stainless screws, pack of 100Fix edging to timber/ground fixings where required and secure kerb trims
- 14Plastic tile spacers1 pack3 mm spacers, pack of 100Maintain consistent joint width between porcelain slabs
- 15Swarf / brush off broom and dustpan (consumable)1Clean sand/grit and slurry from joints and surface during installation
- 19Masking tape and dust sheets1 roll tape + 1 dust sheet24 mm x 50 m tapeProtect adjacent walls and features while cutting/setting/pointing
- 20Diamond blade for cutting porcelain (consumable)1115 mm diamond blade for tile cutter/sawCut porcelain slabs to fit edges and step details
- 21Plastic buckets and sponges (consumable)210 LMixing jointing compound, washing slurry and cleaning off tiles
- 22Waste skip or builders bag hire11 m³ (or large builders bag)Contain topsoil, turf and spoil from excavation and cuts
Tools · 8Reusable — you may already have these
- 16Rubber mallet1Tap porcelain slabs gently into bedding mortar without damage
- 18Sanding block and brush for polymeric compound finishing1Tool to finish and compact polymeric jointing compound
- 23Plate compactor (rental) - for compacting Type 11 (rental)Compact sub-base to required density across patio area
- 24Angle grinder or wet tile cutter (for porcelain cuts)1110-125 mm workable disc sizeCut porcelain slabs to fit edges and step; use diamond blade and water where possible
- 25Trowels (notched and brick trowel) and float2Lay bedding mortar and finish joints
- 26Spirit level and straight edge (2 m)12 mCheck levels, falls to house and step run/step down to grass
- 27Tape measure and string line kit (layout)1Set out 3.0 x 3.0 m layout and straight lines for slabs
- 28Hand saw or disc cutter guide (for small trims)1Trim timber / edging if required
Safety & PPE · 5Reusable — you may already have these
- 17Hard-wearing kneeler / kneepad (consumable for comfort)1 pairProtect knees when bedding and jointing slabs
- 29Gloves - heavy duty & nitrile (pair each)2 pairsProtect hands handling slabs, sand and cement
- 30Safety goggles1Eye protection when cutting tiles and mixing cement
- 31Dust mask / respirator (P2) for cutting and cement mixing2Respiratory protection while cutting porcelain and handling cement/sand
- 32Ear defenders (if using hired plate compactor / angle grinder)1Protect hearing during powered cutting and compaction
Assumptions
builderG inferred these. If any are wrong, say so in the conversation and regenerate.
- Patio area is exactly 3.0 m x 3.0 m (9.0 m²) and rectangular, laid adjacent to an existing house wall with no projection or drain/channel in the way.
- Porcelain selected is 600 x 600 x 20 mm external-grade tiles; layout uses 3 mm joints; 15% wastage allowance applied to tiles (29 tiles ordered).
- Sub-base depth assumed 100 mm compacted MOT Type 1 across the entire patio area; 1.05 m³ quantity includes 5% waste and compaction allowance.
- Bedding mortar assumed as a 1:4 cement:sharp sand bed approximately 20–30 mm thick; quantities given (12 x 25 kg sharp sand, 4 x 25 kg cement) include 10% handling/waste.
- Edge restraint length equals patio perimeter side(s) requiring restraint; a single 3.0 m run of edging/step is required to form the step down to grass.
- Step: a single shallow step (approx 100 mm rise) runs the 3.0 m side to the lawn using precast step/kerb cut to length and bedded with postcrete; user can adjust step height if different is required.
- Polymeric jointing compound quantity (2 x 5 kg tubs) sized for ~9 m² with 3–6 mm joints and includes 15% waste; for wider joints or deeper joints additional product will be required.
- No mechanical drainage outlet required at the house junction; installer should ensure a slight fall away from the building (minimum 1:80) and leave a 10 mm movement gap to the wall to be sealed if close to house — I assumed a small movement gap and external neutral-cure silicone is provided.
- Existing ground is stable and not saturated; if ground is soft or there are drainage issues, deeper excavation and additional sub-base will be required.
- All bags (cement, sand) are standard UK 25 kg bags; quantities are rounded to whole bags where necessary.
- Waste allowance policy used: 10% on sheet/timber equivalents (not relevant here), 15% on porcelain tiles, 5% on aggregates/sub-base.
- User requires hire of plate compactor (one day) — compactor is listed as rental item under Tools.
- Tools listed are those the user may not own; common household items (tape measure, pencil, bucket, hammer, basic screwdrivers) are not listed.
Please note that while builderG provides recommendations based on the input provided, it is ultimately your responsibility to ensure the suitability and safety of the materials for your specific project. We recommend consulting a qualified professional or conducting additional research before making any purchasing decisions.
Like this? Describe your build and builderG will do the same for it — itinerary, products and costs, in about a minute.Create a free account